
IIS 7.x Web Server Configuration to WAS v8.5
Steps to Configure IIS v7 with Websphere Application Server v8.5. Refer to WAS v8.5 Knowledge Center Link for more details here.
Step 1: As mentioned in previous blog entry for IIS Installation, make sure that you are adding Management Compatibility components during Installation of IIS Web Server.
Step 2: We can use WCT tool for creating IIS Web Server definition or we can follow manual process of creating Web Server definition using below information
- Open inetmgr and expand IIS Hostname
- Right-click Default Web Site > Add Virtual Directory to create the directory with a default installation.
- Type sePlugins in the Alias field on the Virtual Directory Alias window.
- Browse to the plugins_root\bin\IIS_web_server_name directory in the Physical Path field of the Web Site Content Directory window, and then click OK. For example, select the C:\Program Files\IBM\WebSphere\Plugins\bin\IIS_webserver1 directory.
- Click the Test Settings button. If the settings test fails, then either change the permissions of the physical directory, or select Connect As, and let IIS connect as a Windows user account that has authority to files in that physical path. When you click the Test Settings button, you might encounter the following warning message if you use the default “Pass-thru authentication” setting.
- Click OK to add the sePlugins virtual directory to your default website.
Step 3: Open Inetmgr from Start (if Plugin generation is done using WCT or else you will be on same screen)
Step 4: Expand IIS Hostname and expand Sites. Under sites, select sePlugins
Step 5: On the Features panel, double-click Handler Mappings (present at the center), and then click Edit Feature Permissions on the Actions panel (Right Hand Side Menu).
Step 6: Select Script and Execute, if they are not already selected and Click OK.
Step 7: Manually copy the plug-in binaries to the plugins_root\bin\IIS_web_server_name directory. For example, copy the plug-in binary files to the C:\Program Files\IBM\WebSphere\Plugins\bin\IIS_webserver1 directory. The plugin-cfg.loc file resides in this directory. The first line of the plugin-cfg.loc file identifies the location of the plugin-cfg.xml file.
Step 8: Select Default Web Site in the navigation tree and Add the Internet Services Application Programming Interface (ISAPI) filter into the IIS configuration.
On the Default Web Site Properties panel, complete the following steps:
Double-click the ISAPI Filters tab.
Click to open the Add/Edit Filter Properties dialog window. (Present at Right Hand side menu)
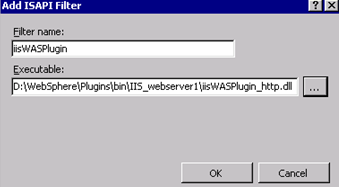
Type iisWASPlugin in the Filter name field.
Click Browse to select the plug-in file located in the plugins_root\bin\IIS_web_server_name\iisWASPlugin_http.dll directory.
Click OK to close the Add/Edit Filter Properties dialog window.

Step 9: In the navigation tree, select the IIS Hostname entry.
Step 10: On the Features panel, double-click ISAPI and CGI Restrictions, and then, on the Actions panel, click Add.
To determine the value to specify for the ISAPI or CGI Path property, browse to, and then select the same plug-in file that you selected in the previous step. For example:
plugins_root\bin\IIS_web_server_name\iisWASPlugin_http.dll
Then type WASPlugin in the Description field, select Allow extension path to execute, and then click OK to close the ISAPI and CGI Restrictions dialog window.
Step 11: Set the value in the plugin-cfg.loc file to the location of the configuration file at plugins_root \config\webserver_name\plugin-cfg.xml.
Step 12: Restart IIS Version 7.x and your WebSphere Application Server profile.